skip to main |
skip to sidebar
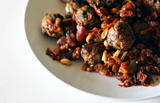
 Lately, in the warmer weather, I've been enjoying pasta toppings that aren't swamped by a thick sauce. Pancetta in the form I've used it for this dish - very thinly shaved - will be sweet and surprising, but easily overpowered if the sauce were any thicker. The onions and tomatoes are sweet too, and through it all comes the strong flavour of rosemary. Use plenty of rosemary, some whole leaves and some snipped. It'll taste like summer.
Penne with Pancetta & Rosemary
3oz / 85g very thinly sliced pancetta (about 15 slices)
1 onion, diced
1 clove garlic, diced
a good handful of fresh rosemary leaves
1 tsp dried red pepper / chilli flakes (or more, or less, to taste)
1 tin peeled whole Italian plum tomatoes*
salt & freshly ground black pepper
penne or other pasta, enough for 2 (main course) or 4 (first course)
Put a frying pan over medium high heat and add pancetta. You can cut the pancetta into smaller pieces with a knife or kitchen scissors; I pull it apart roughly with my hands, so the pieces are still quite large. Cook for approximately 10 minutes, until it's started to curl but isn't yet crispy, then remove from the pan and drain on paper towel.
There should be just enough fat in the frying pan to cook the onions; if there isn't, add a splash of olive oil. Reduce the heat to medium, add the diced onion, and cook until soft, about 15 minutes. Add the rosemary, red pepper (chilli) flakes and garlic, and cook for a further 3-5 minutes, making sure the garlic doesn't colour and stick.
Drain the tomatoes of their canned juice, retaining the juice. Slice off the core of each tomato and squeeze out the seeds (don't keep the seeds). Roughly chop.
Turn the heat under the frying pan up to medium high, and add the tomatoes, the pancetta (I crumble it a little more, and remove some of the fat), and half the juice from the tomato can. Season with a little salt and pepper. Cook, simmering, for about 20 minutes, or until there is very little visible juice.
Meanwhile, cook the penne in plenty of salted, rapidly boiling water until al dente. Drain, then add to the frying pan. Stir through the sauce and cook for a minute or so. Serve immediately with plenty of grated parmesan.
* Later in the summer, when the tomatoes are at their peak, I'll make this with fresh tomatoes, peeled and seeded.
 One day, some years ago, a group of friends arrived in Barcelona for four days. For many of them, it was their first visit. They had the very best intentions - the Picasso Museum, plenty of Gaudi and Miro - but instead, they spent their days eating. Well, their nights staying up late, drinking and talking; their mornings sleeping; their afternoons wandering the city looking for more food; their evenings in tapas bars; their late evenings in restaurants. Since then, most of them have been back to Barcelona and seen everything they intended to on that trip, and more. I doubt any of them would change the way they first discovered the city.
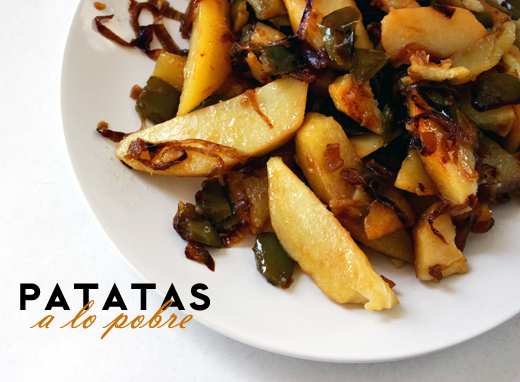
I know I wouldn't. I'd rarely eaten Spanish food before, and there's something so wonderful about discovering a cuisine in the country of its origin. My memories of that and subsequent trips to Spain are very bound up in its food: eating empanadas in a sunny square in Granada before searching the streets for Lorca's house (we found it full of children and men dressed as sailors); hot chorizo sandwiches with sweet sherry, late at night in the Jewish Quarter of Seville; albondigas in a tiny bar in the Alpujarras, watching Eurovision. But I discovered patatas a lo pobre on that trip to Barcelona, my first time in Spain, with those very dear friends.
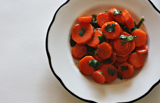
Patatas a lo pobre roughly translates as 'poor man's potatoes', and it's very simple: potatoes cooked slowly in oil, with green capsicum (peppers), onions and bay leaves. It's one of those alchemical dishes in which the simplest of ingredients become complex and surprising in the finished product. It's Andalusian, although it's cooked all over Spain (along with that other incredibly good potato dish, patatas bravas), and it's wonderful with fish or roast meats.
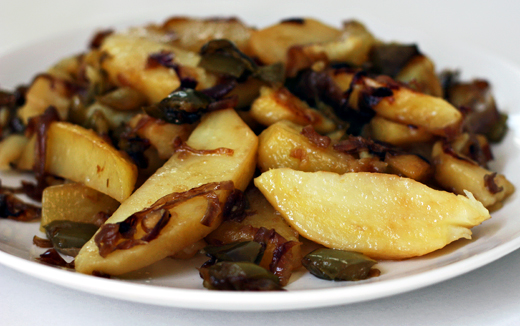 {Also, I would love someone to tell me the correct name for this dish - is it patatas a la pobre, or patatas a lo pobre? I can find both versions online, although the former tends to be on the menus of British restaurants. It's 'a la' in the Moro cookbook, too, which is where this recipe comes from. Alas, it's been too long since I ate these in Spain to remember how they were spelled there.}
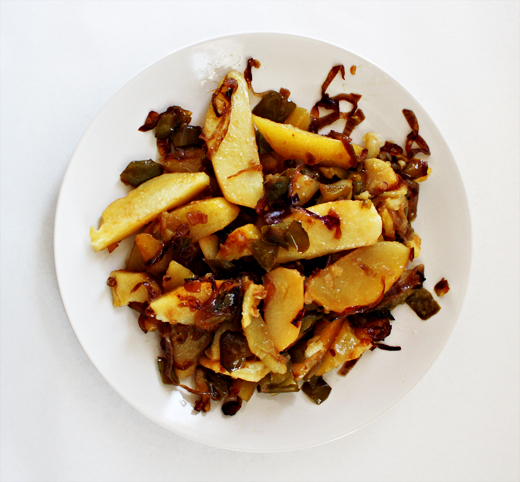 Patatas a lo Pobre
adapted from The Moro Cookbook, by Sam and Sam Clark (US, UK)
8 tbsp olive oil
1 red (Spanish) onion, thinly sliced
1 large green capsicum (pepper), roughly diced
2 bay leaves, preferably fresh
3 or 4 large, waxy-skinned potatoes
Heat 3 tablespoons of the olive oil in a heavy bottomed saucepan over medium heat. When the oil is hot, add the onion and a pinch of salt. Cook the onion slowly, turning down the heat if necessary, for about 20-30 minutes, stirring occasionally, until golden and sweet in smell and taste. Now add the garlic, capsicum (green pepper) and bay leaves and cook for 15 more minutes to release their flavour.
Meanwhile, cut the potatoes in half lengthways and each half in two or three wedges, depending on the size of the potato. Salt them lightly and leave for about 5 minutes. When the capsicum (pepper) has softened, add the remaining oil and when the oil is hot again, add the potatoes. Let everything simmer gently, stirring occasionally, for another 15-20 minutes or until the potatoes are tender. Drain in a colander or sieve, keeping the onion oil aside for further use if desired. Serve immediately.
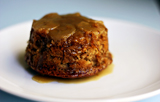
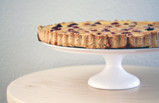
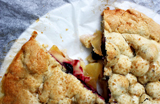
 Hooray for the lo-fi fruit tart, with pastry rolled out by a gin bottle and no need for tart pans or pie dishes. Because almost all my kitchen equipment is in storage, I made this pastry with nothing more complicated than a cheese grater. And the result is such a simple marriage of taste: sweet strawberries, buttery pastry. Like all fruit pies, it's best eaten hot with something creamy and cold.
 I look back at the time when I never made my own pie and tart crusts because I thought you needed a food processor to do it, and think sadly of everything I missed out on. One day, yes, I'll buy a food processor (one day when I stop moving every 7 or 8 months, which will be very soon), but won't it be nice to know I can do all this by hand if I want to? I do recommend a rolling pin over a gin bottle, however, even when it's a beautiful brown Hendrick's one (alas, empty of gin). I know I can manage thinner pastry and neater edges than these, but at the same time, the point of a free-form pie is to look artless and comfy.
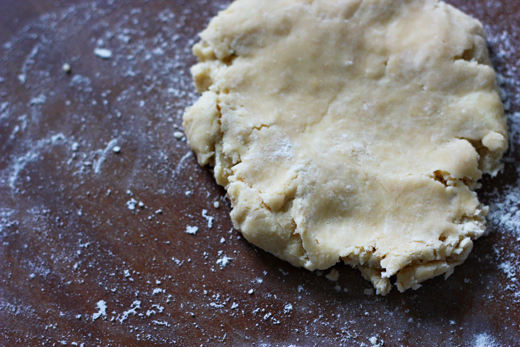 I make pastry by freezing the butter, still in stick form, and then grating it while frozen on the larger round holes of a cheese grater. Lately I've been using the pâte brisée recipe on Simply Recipes; I've re-written it here only to give instructions for making it by hand. To use a food processor, follow the link to the recipe on Elise's site.
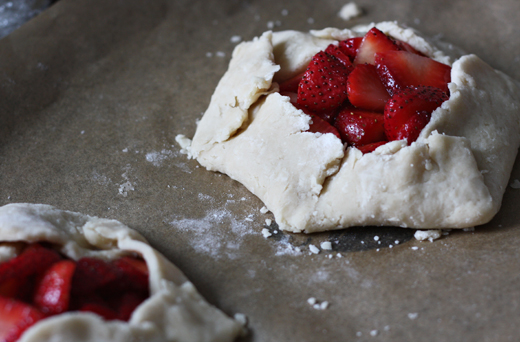 Strawberry Galette
For the strawberry filling:
adapted from here
1 punnet strawberries (4-5 oz)
3 tbsp sugar
1/2 tsp cornflour (cornstarch)
a squeeze of lemon juice
For the pastry (from Simply Recipes):
1 1/4 cups all-purpose (plain) flour, plus extra for rolling
8 tbsp (1 stick) unsalted butter, frozen (in the freezer for at least half an hour)
1/2 tsp salt
1 1/2 tsp sugar
2 to 5 tbsp ice water, very cold
Also: a little extra sugar, and a little butter
To make the pastry: grate the butter on the larger round holes of a cheese grater. Return the grated butter to the freezer for 20 minutes or so, to chill again.
In a large bowl, combine flour, salt and sugar. Add frozen, grated buter and work into the dry ingredients very briefly with your hands. Some of the flakes of butter should stay large, and others will be incorporated into the flour; you want it to reach the texture of oatmeal, and pieces of butter should still be visible in the finished pastry (that's what makes it so flaky when cooked).
Add the ice water one tablespoon at a time, mixing very briefly between tablespoons. If you pinch some of the crumbly dough and it holds together, it's ready, if not, add a little more water and pulse again. You may not need to use all 4 tablespoons of water.
Remove dough from bowl and place on a clean surface. Carefully shape into a disc. Don't over-knead; it just needs to come together enough to hold a circular shape. Sprinkle the disc with a little flour on all sides. Wrap it in plastic wrap and refrigerate at least 1 hour.
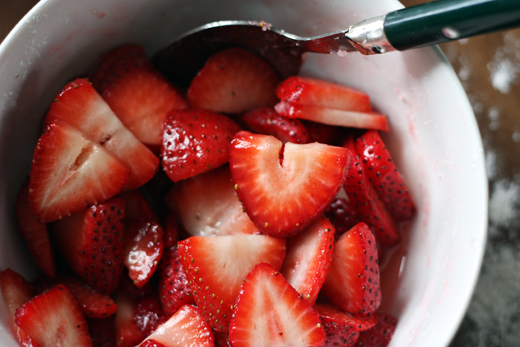
Macerate the strawberries: remove the leaves from the strawberries, then slice. Place them in a bowl with the sugar and cornflour, squeeze over a little lemon juice, and stir everything together. Leave for half an hour to an hour, until the strawberries are sitting in lots of pink, sugary juice.
Preheat the oven to 375°F/190°C. Line a baking tray/cookie tin with baking paper.
Remove the pastry from the fridge and let it sit for 5 to 10 minutes, until it's easy to roll out. On a clean, floured surface, roll the pastry into a rough circle, about 1/8 inch thick (about 3 mm). (If, like me, you're making 2 small pies, divide the pastry in 2 and roll separately.) I found it easiest to transfer the rolled out pastry onto the baking tray at this point. Put the strawberries in a pile in the middle of the pastry circle, bringing as little of their juice with them as possible*, and leaving a border of about 3 inches around the edges for a large pie, or 1.5 inches for 2 smaller ones. Fold the pastry up around the strawberries, pleating as you go, so that a central area of fruit remains uncovered. Press down on the pastry folds to stop them from separating in the oven. Sprinkle the pastry with a little sugar, and dot the top of the strawberries with a little butter, no more than half a tablespoon.
Bake for 25-30 minutes, until the pastry is golden. Serve warm with vanilla ice cream or thick cream. The juice will have bubbled up and run down the sides the sides of the galette, so be careful when lifting and serving.
* The strawberries will produce lots of juice while baking, so don't put any extra into the pie. I stirred the leftover juice into Greek yoghurt.
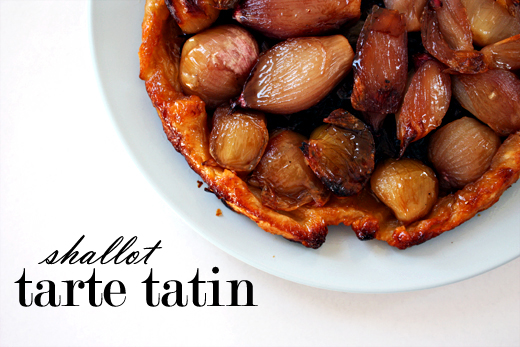
Yes, I know this tart looks like a lot of onions. And it really, really is. In fact, the caramelised shallots you can see most easily in these photos rest on a bed of red onion jam (you can imagine just how good that smells). But all these onions go through a long, sweet cooking, and they're sharpened with balsamic vinegar, and paired with buttery pastry, so their indisputable onion-ness is milder and more unassuming than you'd expect. I don't know what the Tatin sisters would think of this incarnation of their apple tart; I hope they'd approve.
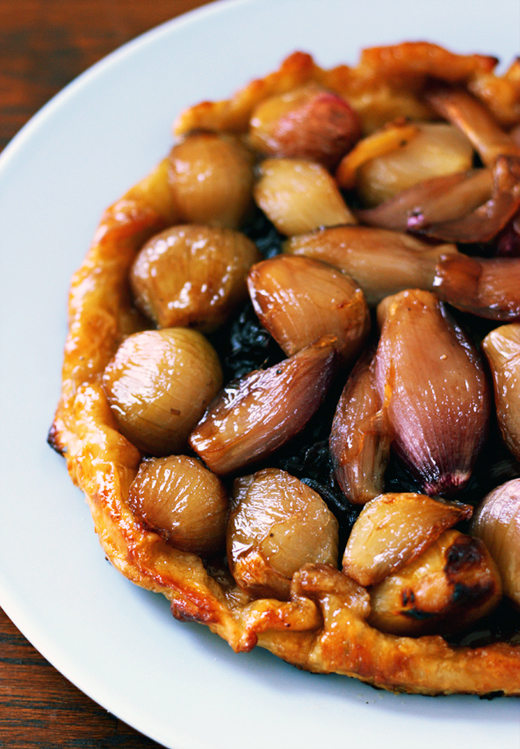 It's not the most refined looking of tarts, but that's not really the point of a tarte tatin, which after all is officially upside down. But it looks coppery and lovely on the plate, and there's something so lavish about an abundance of one ingredient.
The red onion jam is so good it's worth making a double serving and throwing it onto sandwiches or burgers, or using it as the base for pasta sauces, or eating it with cold meats, etc etc. It'll keep well in a sealed container in the fridge for a couple of weeks.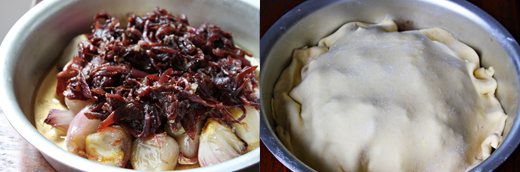
 Shallot Tarte Tatin
adapted from Australian Gourmet Traveller
Serves 4
1 sheet good quality puff pastry
30ml olive oil
approx. 28 shallots
1 tbsp sugar
2 tbsp butter
25ml red wine vinegar
For onion jam:
a glug of olive oil
1 garlic clove, finely chopped
2 tbsp unsalted butter, coarsely chopped
2 red (Spanish) onions, very thinly sliced
a handful of thyme leaves
1 tbsp sugar
1/8 cup (30ml) balsamic vinegar
To make the onion jam: heat a large saucepan over medium heat. Add olive oil and garlic and stir occasionally until starting to caramelize (3-5 minutes). Add butter, onion and thyme, increase heat to medium high and stir frequently until onion begins to collapse (7-10 minutes). Add sugar and stir frequently until onion caramelizes (2-3 minutes). Add vinegar, reduce heat to low and stir occasionally until jammy (35-40 minutes). Season to taste. Cool.
To make the tarte tatin: preheat oven to 190°C / 375°F.
Peel the shallots, and trim the roots without cutting off the core (you want to keep that as intact as possible, so the shallots will stay together). Cut large shallots in half lengthways.
Heat a wide frying pan over medium-high heat, add oil, then shallots.* Stir occasionally, and very carefully (again, to keep the shallots intact) until golden (6-8 minutes). Add sugar and cook for 3-5 minutes, then butter. Cook, stirring occasionally, until a deep caramel colour, about 5 minutes. Add vinegar, reduce heat to low, season to taste and cook until shallots are soft (about 20 minutes). Allow to cool.
Butter a cake tin or shallow circular cooking dish. The size isn't particularly important, as long as it will accommodate an 8 or 9 inch tart; you want something that's going to be easy and safe to flip over later.
{I've included photographs of the following steps above, in case they're confusing}
Carefully place the shallots in the cake tin, with their flattest sides facing up toward you. Don't spread them out to fill the tin, but push them close together in the very middle of it. Pour over the caramelised juices. Spoon the onion jam over the top of the shallots. Take a sheet of puff pastry and lay it gently over the top of the onion mound, trimming off any obvious excess and tucking the rest of it around the shallots.
Bake until golden and crisp, 12-15 minutes. Cool for 5 minutes. Loosen edges with a small knife, and then - very quickly and very carefully, while wearing oven mitts - invert onto a serving plate. Serve warm.
* If you have a tarte tatin dish, you can caramelise the shallots in it, then add the onion jam and pastry straight over the top.
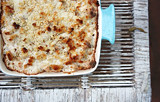
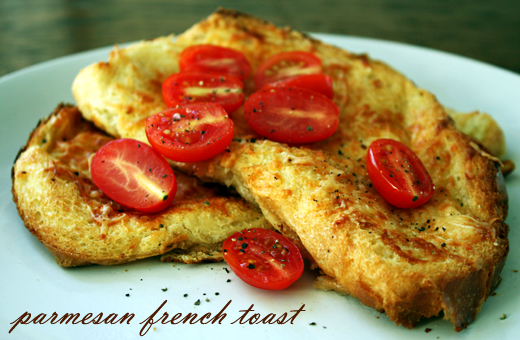 This has been a busy, busy week - I semi-moved yesterday - and meals have been quick and easy and nondescript. But this light supper, eaten among half-open boxes and the wreckage of my kitchen, was so simple and good that I had to share it. It's the best cheese on toast I've ever eaten, and felt much less like the exhausted and makeshift meal it really was. The cheesy top is crusty and golden; underneath, the bread is soft and eggy and light. It fortified body and soul. And it's nice that you don't fry it, too.
All my things have been shipped away, and now I have two weeks of living in an empty apartment, which is an odd experience. Not so much out-of-body as out-of-life. I'll only have a couple of pots and plates to cook with, and there's a strange collection of half-opened packets and jars in my cupboard and fridge that I should try to use up before I leave. It might be liberating and inventive and fun, or I might order a lot of pizza. We'll see.
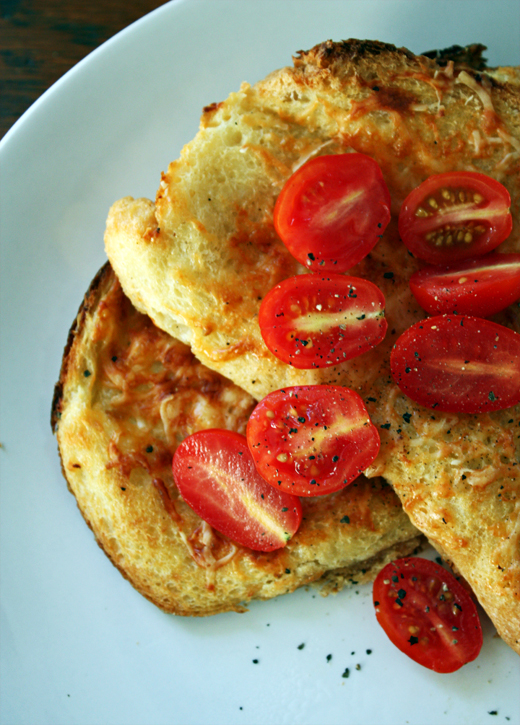 Savoury Parmesan French Toast
adapted from Gourmet, May 2009
makes 2 pieces
2 thick slices of good bread
1/2 cup whole milk
1 small egg
1/4 cup freshly grated parmesan
1/2 tbsp salted butter
salt and pepper
Preheat the oven to 200°C/400°F. Butter a small shallow baking dish or pie plate. Arrange bread in 1 layer in dish (it's important that your bread only just fit in the dish).
Whisk together milk, egg, and a little salt and fresh pepper. Pour over bread. Sprinkle with cheese. Press the bread lightly to help absorb custard. Let stand until fully absorbed, 10-15 minutes.
Dot with butter and bake, uncovered, until puffy and golden, 20-25 minutes.
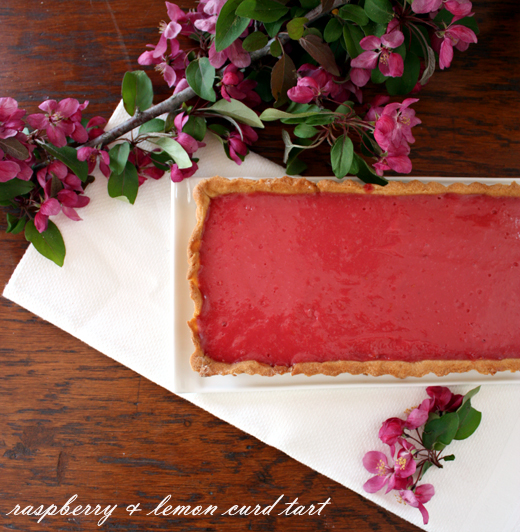 Here's what I made with my lemon meringue tartlet leftovers: a raspberry and lemon curd tart. There's no real recipe - I used the leftover pastry, and extended the lemon curd by blending and straining some frozen raspberries and mixing them in - but I wanted to show you, because the colour is so pretty. This would have been lovely as small bites as well; it also cheekily meant I could cook for two events (with some overlapping guests) using the one recipe.
I think the combination of lemon and raspberry isn't used often enough, and I'm going to play around with a proper version of this tart in the summer, when I have fresh raspberries.
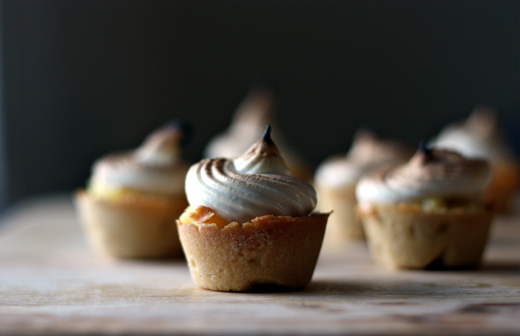
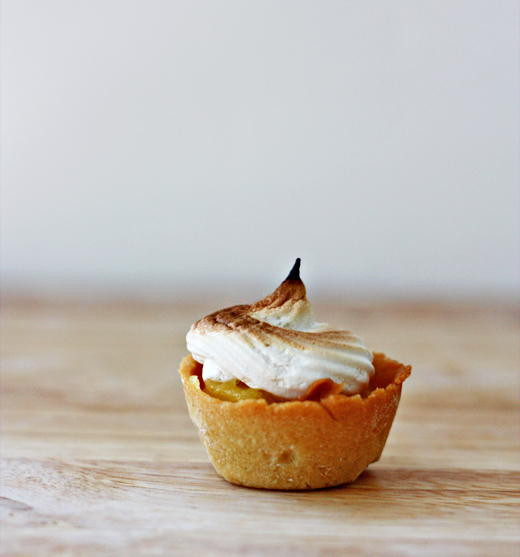 I like finger food at parties; I like eating it, and I like making it. It makes everything seem a little more festive. Also, small food, like small animals, brings out people's parental instincts. They're evolutionarily well disposed toward it. These little lemon meringue pies, for example, were greeted with the admiring cries usually reserved for small babies.
The brown sugar pastry crust is as easy to mix as cookie dough, and as pliant and forgiving to work with. The lemon curd filling comes together quickly in a saucepan. It's all topped with soft Italian meringue and waved under a hot broiler for a few seconds to caramelize. And then, crowded all together on a big plate, they look burnished and beautiful. I wish I had more photos of how pretty they are, but I was running late and the light was failing...the one above was a solitary little guy I rescued from party consumption to photograph the next day (and then eat!).

I made 24 tartlets (the capacity of my mini muffin pan), and could have made at least half as many more, but used my excess for something else I'll show you soon. If you're not excited by the idea of cutting out dozens of squares of baking paper and filling them laboriously with beans, you could make larger tarts, and even one large tart; all that would change is the amount of time the pastry needs to spend in the oven, in the second stage of blind baking. If you need to cook your pastry for longer, then make sure you keep the edges from browning by covering them with strips of tinfoil.
 Lemon Meringue Tartlets
adapted from Gourmet and Australian Gourmet Traveller
For the pastry:
100g soft unsalted butter
100g light brown sugar
2 eggs
270g plain flour
For the lemon curd filling:
1 cup sugar
6 tbsp cornstarch/cornflour
1/4 tsp salt
1 cup water
1/2 cup milk
4 large egg yolks
1 tbsp unsalted butter
1/2 cup fresh lemon juice
2 tsp freshly grated unwaxed lemon zest
For the meringue:
110g (1/2 cup) caster/superfine sugar
55g (1/4 cup) golden caster sugar or demerara sugar*
2 egg whites
To make the pastry, beat butter and brown sugar using an electric mixer until pale, about 5 minutes, then add eggs and beat to combine. Add flour, beat until just combined, turn onto a lightly floured work surface, form into a disc, wrap in plastic wrap and refrigerate for 2 hours.
To make the lemon curd filling, whisk the sugar, cornstarch and salt together in a heavy saucepan. Gradually whisk in water and milk, whisking until cornstarch is dissolved. In a bowl whisk together egg yolks. Cook milk mixture over moderate heat, whisking, until it comes to a boil. Gradually whisk about 1 cup milk mixture into yolks, and then whisk the entire yolk mixture into the rest of the milk mixture. Simmer mixture, whisking, 3 minutes. Your curd should have thickened by now - if not, continue cooking and whisking until it does. Remove pan from heat and whisk in butter, lemon juice, and zest, until butter is melted. Cover surface of filling with plastic wrap.
Butter a mini muffin pan. Roll pastry on a lightly floured surface to 2mm thick. Cut out circles to fit the tart pan you're using - for my mini muffin pan, that was just over 2 inches. Line the mini muffin indentations with pastry circles, neaten the edges and trim so they're level with, or just above, the top of the pan, and refrigerate for 30 minutes.
Preheat oven to 180°C/350°F. Line pastry-lined muffin pan with baking paper, weigh down with pastry weights, rice or dry beans and bake for 10 minutes, then remove paper and pastry weights and bake for another 10 minutes or until crisp. Cool for 10 minutes, then spoon in the lemon curd, filling each cup level, and set aside.
To make the meringue, combine sugars and 1/4 cup water in a heavy-based saucepan and stir over low heat until sugar dissolves. Increase heat to high and cook until syrup reaches 115°C/240°F on a sugar/candy thermometer, then remove from heat. Meanwhile, using an electric mixer, whisk egg whites until soft peaks form, then, with motor running, very slowly add hot syrup and whisk for 5 minutes. Spoon or pipe meringue over lemon curd, forming into peaks. Place pies under a hot grill/broiler for a few seconds until meringue is golden (watch carefully - they could burn very quickly) or use a blowtorch to brown meringue lightly. The tarts keep well in the fridge, but the longer you leave before serving, the softer the meringue and the pastry will get.
* If you don't have either of these sugars, it's fine to use caster/superfine for the whole amount of sugar.
 I love cooking fruit with meat, particularly pork and apples. It's a little like introducing two old friends to each other, and watching them get on as well as you expected them to. These pork chops with apples and sage, adapted from a recipe by Jamie Oliver, are wonderfully companionable. They spend a little time on the stove-top, browning and crisping, and then get comfortable in the oven for a few minutes more.
Also, this was the best sage I've ever eaten. Something about the brief frying and then the time in the oven makes the leaves perfectly crisp, and concentrates the flavour beautifully. Crisp sage, sweet apples, tender pork: delicious.
Pork chops can get tough and dry, so I brine mine. All that means is soaking the pork in a water, sugar and salt solution for up to 12 hours before cooking them. You can add ingredients to the brining liquid for extra flavour - I slipped in a clove of garlic and some sage, and next time I make this I might replace a little of the water with apple cider vinegar. You can skip the brining, of course (Jamie's recipe doesn't include this step), but it's very little work for a great deal of difference. All you need to do is plan in advance, even just by a couple of hours. Just remember that brined meat is saltier, so you won't need to add salt later in the cooking.
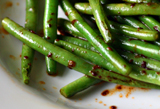
This was one of my favourite meals this year. I served it with creamy mustard potato salad, shallots caramelised in brown sugar and balsamic vinegar, and lightly steamed French beans.
Pork Chops with Apple & Sage
adapted from Jamie Oliver on Serious Eats
To brine:
3 3/4 cups water
1/4 cup coarse salt (sea salt; or kosher salt, which is cheaper)
1/8 cup sugar
pepper
1 clove garlic, peeled and sliced
a few sage leaves
To cook:
2 thick pork chops, about 9 oz each
sea salt and freshly ground black pepper
olive oil
1 good eating apple, peeled, cored and each cut into 8 wedges
1 tbsp butter
a handful of fresh sage leaves
To prepare the brining liquid:
Boil the water. Dissolve the sugar and salt in the boiling water, then remove from the heat. Add pepper, and chill the water before adding the pork.
Prepare the pork by making some slashes with a sharp knife along the fatty side of each chop.
Place the chops in the brining liquid. Add the garlic and a few sage leaves. Cover and refrigerate for at least 2 hours, or overnight.
When you're ready to cook the chops, preheat the oven to 400°F/200°C.
Remove the chops from the liquid and wash thoroughly, twice. Dry with paper towel and grind pepper over both sides (if you haven't brined the chops, you should also sprinkle them with salt).
Pour a glug of olive oil into a hot skillet.* Carefully place your chops in it and cook them for 2 to 3 minutes on each side until golden brown. When the chops are nearly done, remove them from the skillet. Add the apple wedges and the butter to the pan and fry until a light golden brown. Add the sage leaves and fry for a further minute. Return the pork to the skillet, and scoop some of the apple and sage over the top of each chop. Put the skillet into the oven for 4 to 6 minutes until everything is golden and the sage is crisp. These chops will be pinkish on the inside; if you prefer less pink, leave them in the oven for another 3 or 4 minutes.
* If you don't have a skillet, or a frying pan that also goes into the oven, do what Jamie does: brown the meat, put it in a baking dish, fry the sage and apples, pour them over the chops in the baking dish, and place the dish in the oven.
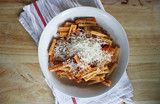
 This is a simplified version of a much richer sauce from one of the River Cafe cookbooks. That one - which is so delicious that I make it much more often than I should - uses more cream, more tomato, red wine and rosemary. It's a wintery dish, and it takes a long time to make right. This is my faster, warmer-weather version of the sauce: thyme instead of rosemary, no wine, garlic, and a bit less of everything.
It's important to use sausages you really enjoy the taste of - anything porky and herby and good will do. Other kinds of pasta will work too, but this is one of those sauces that really benefits from everything being roughly the same size, which is why it's so good with small shells, and even better with orecchiette.
Spicy Sausage Pasta
serves 2
olive oil
1 red onion, diced
a handful of thyme leaves
red pepper flakes (dried chilli flakes) - as many as you like - 1/2 tbsp for a decent kick
1 garlic clove, peeled and finely chopped
2 good pork sausages, meat removed from their skins and separated into small pieces
1 approx. 400g tin of peeled tomatoes
1/2 pint cream
salt and pepper
shell pasta or orecchiette
parmesan to serve
Heat a glug of olive oil in a pan over a medium heat. Brown the pieces of sausage in the oil, breaking up larger chunks until they're the size you'd like to eat. Remove from the pan and drain on paper towel.
Add the thyme leaves to the pan and cook, stirring, until fragrant, about 2 minutes. Add the onion and red pepper flakes and cook until soft, about 15 minutes. Add the garlic, cook 1 minute, and then return the sausage to the pan.
Drain the peeled tomatoes*. I like them with fewer seeds in this dish, but don't fuss about it; cut the core out and give them a squeeze so most of the seeds will come out. Dice the tomatoes and add to the pan. Season with salt and pepper. Cook for about 10 minutes, stirring occasionally.
Cook the pasta in plenty of salted, rapidly boiling water.
A few minutes before the pasta is ready, add the cream to the sausage mixture and stir well. When the pasta is almost al dente, drain thoroughly (especially important will shell pasta), then add to the sauce. Mix well. Cook for a minute or two more before serving with lots of parmesan and black pepper.
* Keep the liquid - it's good in stock, or use it to extend the sauce.
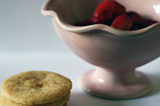
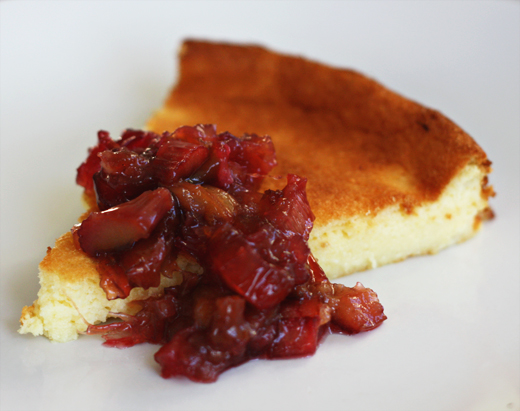
 This is like cheesecake, only yoghurt-y. I hope that appeals to you; I find it irresistable. Like many good things to eat, it's Turkish in origin. It's light and creamy with a hint of lemon, and it looks elegant and simple on the plate. Easy dinner party food. I served it cold from the fridge and it was fantastic; it was even better later, at room temperature.

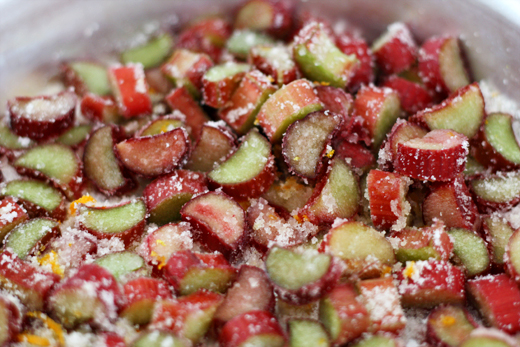
 When I was young, the back of our family fridge was occupied frequently by a huge jar of swampy pink juice. If you looked hard, turning the jar this way and that, then stalks of my grandmother's home-grown rhubarb would float out of the murk. I hated rhubarb (or at least, I thought I did). My father would spoon it out of the jar into a bowl and eat it with ice cream, to his children's slightly pitying disgust. Now I love it. I'm so happy to see it at the market in spring, looking sort of like camp celery.
This recipe for stewed rhubarb pairs it with ginger, and the results are good enough to eat on their own. I kept spooning it out of the pan - the sugary pink juices are wonderful. This same pink, gingery sweetness is a great foil to the slight tartness of the yoghurt cake. When rhubarbs aren't in season, I'd serve the cake with an orange blossom syrup, or some dried figs poached in honey.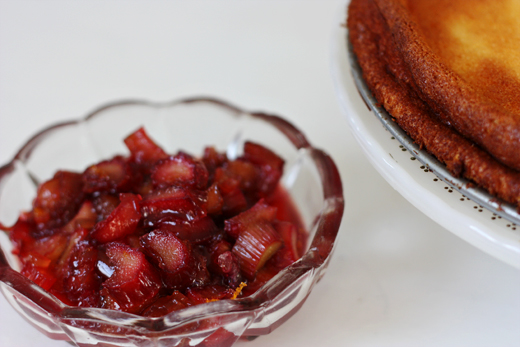
 Turkish Yoghurt Cake
from Claudia Roden, Arabesque (US, UK)
4 large eggs, separated
1/2 cup superfine (caster) sugar
3 tbsp all-purpose (plain) flour
1 2/3 cup strained Greek-style yoghurt
grated zest of 1 unwaxed lemon
juice of 1 lemon
Preheat the oven to 350°F / 175°C.
Beat the egg yolks with the sugar to a thick, pale cream. Beat in the flour, then the yoghurt, lemon zest, and lemon juice until it is thoroughly blended. Whisk the egg whites until stiff and fold them into the yoghurt mixture. Pour this into a round, nonstick baking tin (about 9 inches in diameter), greased with butter.
Bake for 50 to 60 minutes, until the top is brown. It will puff up like a soufflé and then subside. Turn out onto a serving plate, and serve warm or cold.
Stewed Rhubarb with Ginger
adapted from Simply Recipes*
3 cups rhubarb stalks (about 4 stalks), green leaves discarded, cut into 1/4-inch slices
1/3 cup sugar
zest of one orange
2 tbsp minced candied ginger
1/2 tsp vanilla extract
1 tbsp butter
Preheat the oven to 350°F / 175°C. (This could easily be prepared on the stovetop - and in that way, I suppose, would be properly stewed - but if you're making it together with the yoghurt cake, it makes sense to cook them in the oven together.)
Combine the rhubarb, sugar, orange zest, vanilla and ginger in a lightly buttered baking pan and allow to macerate for 15 minutes. Cut the butter into small pieces and dot over the surface of the fruit. Bake for 20 minutes, or until the rhubarb is soft.